Create a Help Desk Ticket
Print
Modified on: Fri, Apr 14, 2023 at 10:50 AM
Create a Help Desk Ticket
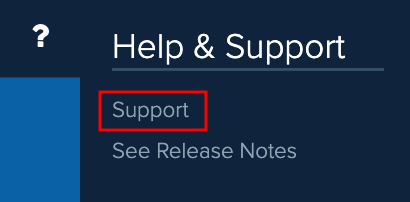
1. Select Help & Support > Support from the left navigation menu.
2. This launches the Help & Support dialog:

3. Use the available fields and drop-down lists to enter your TRONIX Help Desk ticket.
Item | Description |
Email Address | This will default to your username email address. You can enter a different email address where the TRONIX support team can contact you if needed. |
Subject | Enter an appropriate and informative subject for the TRONIX support team. |
Description | Enter a detailed description of the problem. Provide as much information as possible for troubleshooting purposes. |
Phone Number | This will default to the phone number added to your user. Enter a different contact phone number if needed. Do not use special characters such as the () or -. This is a required field. |
Company | This will default to your primary dealership set up for your user. Enter another dealership if needed. This is a required field. |
Type | Select the issue type for this ticket: - Menu Issue - Select to report an issue involving a menu template.
- DMS Pull Issue - Select to report an issue when performing a DMS pull.
- Contract Issue - Select to report an issue involving a contract, such as rate/fee changes, cancel contract corrections, and mileage corrections.
- Transmittal Issue - Select to report an issue involving a transmittal (an invoice or a record of sale of an F&I product).
- Report Issue - Select to report an issue involving a report.
- User Setup - Select to report an issue involving how a user is configured.
- Dealer Setup - Select to report an issue involving how a dealer is configured.
- Technical Issue - Select to report any technical issue, such as TRONIX not functioning properly, pages not loading properly, or features not working correctly.
- VIN / Class Issue - Select to report an issue involving a vehicle's VIN or class.
- Program / Product Update - Select to request a program or product update.
- Feedback/Feature Request - Select to provide feedback on TRONIX or to request development of a new feature.
|
Priority | Select the priority for this ticket: - Low - Select for minor issues, recommendations, or general inquiries.
- Medium - Select for routine support requests that impact a single user or non-critical software or hardware error.
- High - Select for an issue that is not critical but is significant and affects a single user; or an issue that is degrading the performance and reliability of TRONIX; however, TRONIX is still operational. This issue can be escalated to Urgent if it is not quickly addressed.
- Urgent - Select for an issue that is impacting a significant group of users or for a mission-critical issue that is affecting a single user.
|
Send Feedback | Click this button to submit your ticket to the TRONIX support team. The team will contact you shortly. |
Did you find it helpful?
Yes
No
Send feedback Sorry we couldn't be helpful. Help us improve this article with your feedback.